Table of Contents
LSB Application Checker Getting Started
This document describes general steps on getting started with the LSB Application Checker.
Contents
===== Installation =====
- Download the Linux Application Checker package (tar.gz) for your architecture from the Downloads page.
- Unpack the package:
tar xzf Linux-app-checker-local-<i><version>.<i><architecture>.tar.gz - Start the Linux Application Checker by running the script:
./linux-app-checker/bin/app-checker-start.pl <i>[port-number]
The Application Checker will be running with the current user's privileges. - This script will start a simple web server embedded in the Linux Application Checker and will try to locate and open your web browser with the proper address for this server.
Notes:
- The port-number argument is optional (by default 8889 is taken).
- If the script could not find your web-browser and you wish to use Web-UI, please start the browser manually and specify the address http://localhost:8889/ (the port number should be the same as specified on the previous step).
- You may also connect to the Linux App Checker from any remote computer by specifying the URL http://<test-machine-name>:8889/ in your web-browser.
Using The Web Interface
- In the browser you will see the main page of the Application Checker.
- For specifying your application to test, open the Application Check page. You can see the following options here:
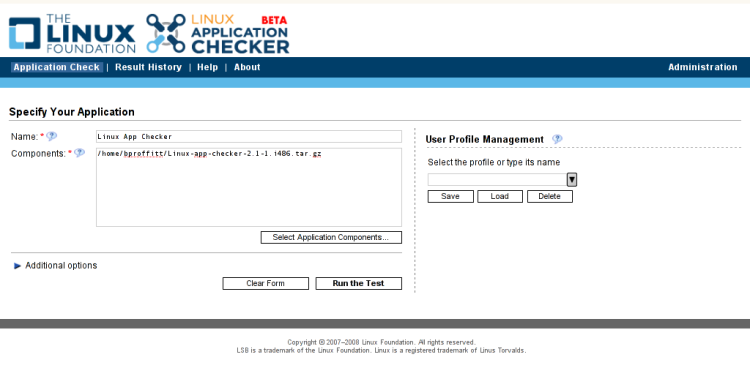
You should specify name of the application and all application binaries (both executable and libraries supplied with application) to test. You can also add directories with all their contents, RPM and TAR.GZ packages and installed RPM or DEB packages (depending on your system). Then select the LSB version and profile (the Architecture field cannot be changed currently as this option is not supported by the lsbappchk and lsbpkgchk) and after that click the Run the Test button.
Note: There are some prerequisites for the test suites to be able to run (listed in the<i><app-checker-dir>/READMEfile). If they are not met, an error message will be shown at the top of the page when you try to run the tests. In this case you will have to eliminate the problems and run the tests again.
- The test will be executed and you will be redirected to the Result History page. It contains the exhaustive information about the test run.
From this page you can start certification process for the application you have just tested. To do so, just click the apply for certification link, and you will be redirected to the Certification System.
- Along with the LSB compliance checks, an additional analysis of the application can be performed. The results of this analysis can be uploaded to the Linux Foundation for inclusion into the Linux Applications section of the LSB Navigator. Meanhwile, the Application Checker allows you local viewing of the most informative part of the analysis results: the list of the external libraries and interfaces needed by the application. To view this list, click the corresponding link at the top of the Test Results page. Here is how this list may look:
On first opening of this page, some time may be needed to construct the data lists.
- From the Analysis Results page and from the Test Results page you can go to the upload form, which allows you sending the results of the analysis to the Linux Foundation.
You should provide your name, E-mail and name of the application. In addition, you can specify the version and homepage of the application and some comments. Before submitting the data you can view the contents of the file that you are going to send. - The list of all the reports generated for every test run is shown on the Results page:
To view any particular report, just click the corresponding link in the Date/Time column. To remove some of the reports, just select them with the check boxes and press the Remove Selected Entries button.
Test Results Repository
The results for test runs are stored in the directory /var/opt/lsb/app-testkit/manager/results for the installable version and in ./lsb-atk-manager/results for the non-installable one. All the files from each test run are stored in separate subdirectory named <arch>-<machine>-<application>-<date>-<time>. For the result to be visible on the Results page of the Web-UI it should be listed in the …/results/HISTORY file.
If you are using Web-UI for running the tests, the HISTORY file is managed automatically. If you copy the test results from another machine or another directory by hand, you will need to write the directory names into this file manually.
=====Finalizing the Results=====
- To stop the web-server, go to the Administration page in the web-interface and press the Stop server button. Alternatively, you may run the script
<i><atk-manager-dir>/bin/lsb-atk-stop.pl <i>[port-number]
The port number is optional and can be used when there are several ATK Manager servers running on the same machine (if in this case you do not specify the port number, you will be asked for it). - If you wish to deinstall the installable LSB ATK version, use your package manager (rpm or dpkg) to remove the following packages:
- lsb-atk-manager
- lsb-appchk
- lsb-appchk-perl
- lsb-appchk-python
- lsb-pkgchk
- After that you may also wish to delete the old results, logs and other data from the /var/opt/lsb/app-testkit/manager directory.
- To deinstall the non-installable LSB ATK version just remove its directory.
Warning: this directory contains not only the ATK Manager, but also all your test results!
