Submitting a LAVA test job
This page provides a brief overview on how to submit a test job the CIP LAVA infrastructure using the LAVA website interface.
Step 1
Sign in to the CIP LAVA website: https://lava.ciplatform.org/accounts/login/
If you do not have any login credentials then please make a request on the cip-dev mailing list.
Step 2
Go to the job submission page: https://lava.ciplatform.org/scheduler/jobsubmit
Or you can navigate using the Scheduler menu at the top.
Step 3
Enter the job definition that you wish to run in yaml format.
CIP have provided a number of example job definitions on GitLab that can be re-used.
In this example we will use rzg1_integration_tests.yaml as a base.
Step 4
Update the job definition to match your requirements. For example the following sections have been updated in this example.
See the Job #910 yaml definition for an example of where rzg1_integration_tests.yaml has been used.
device_type
Set this to the specific device type you want to test. The currently supported device types can be seen on the CIP LAVA website.
device_type: r8a7743-iwg20d-q7
job_name
Add a relevant name to help identify the test job.
job_name: RZ/G1 CIP Integration Tests
tags
Tags are used to specify whether specific hardware functionality is required in order to run a test.
In our example three tags are used to indicate that SD and USB memory devices are required.
tags:
- sdhi0
- sdhi1
binaries
Provide links to the Linux Kernel, device tree and root file system you want to use for testing.
actions:
- deploy:
    timeout:
      minutes: 5
    to: tftp
    os: oe
    kernel:
      url: https://s3-us-west-2.amazonaws.com/download.cip-project.org/ciptesting/cip-lava/kernel/linux-4.4.y-cip-latest/shmobile_defconfig/uImage
      type: uImage
    nfsrootfs:
      url: https://s3-us-west-2.amazonaws.com/download.cip-project.org/ciptesting/cip-lava/rfs/core-image-minimal-iwg20m-20181127150428.rootfs.tar.gz
      compression: gz
    dtb:
      url: https://s3-us-west-2.amazonaws.com/download.cip-project.org/ciptesting/cip-lava/kernel/linux-4.4.y-cip-latest/shmobile_defconfig/r8a7743-iwg20d-q7.dtb
login_prompt/username
Make sure the login prompt and username/password are set correctly. This allows LAVA to log into the platform through the serial console.
  auto_login:
    login_prompt: 'iwg20m login:'
    username: root
prompts
Make sure the console prompt is set correctly. This allows LAVA to know when it can provide inputs to the terminal.
  prompts:
    - 'root@iwg20m:~#'
notification
Optionally a notification block can be added. This can be used so that an email is sent when a job is complete.
notify:
  criteria:
    status: finished
  recipients:
  - to:
     method: email
     email: cip-testing-results@lists.cip-project.org
Step 5
Validate the job definition by pressing the blue 'Validate' button.
Submit the job by pressing the green 'Submit' button.
Once submitted the job will be added to the queue and will be scheduled to run when a device of the requested device-type has become available.
The job queue can be viewed in the all jobs page.
Step 6
Once the job starts running its progress can be viewed in real time by clicking on the blue eye button  .
.
The log from Job #910 can be viewed here.
Step 7
Once a test is complete (or even whilst the test is still in progress), results can be browsed in the results screen. This can be access through the menu or by clicking the green graph button  from within a test job.
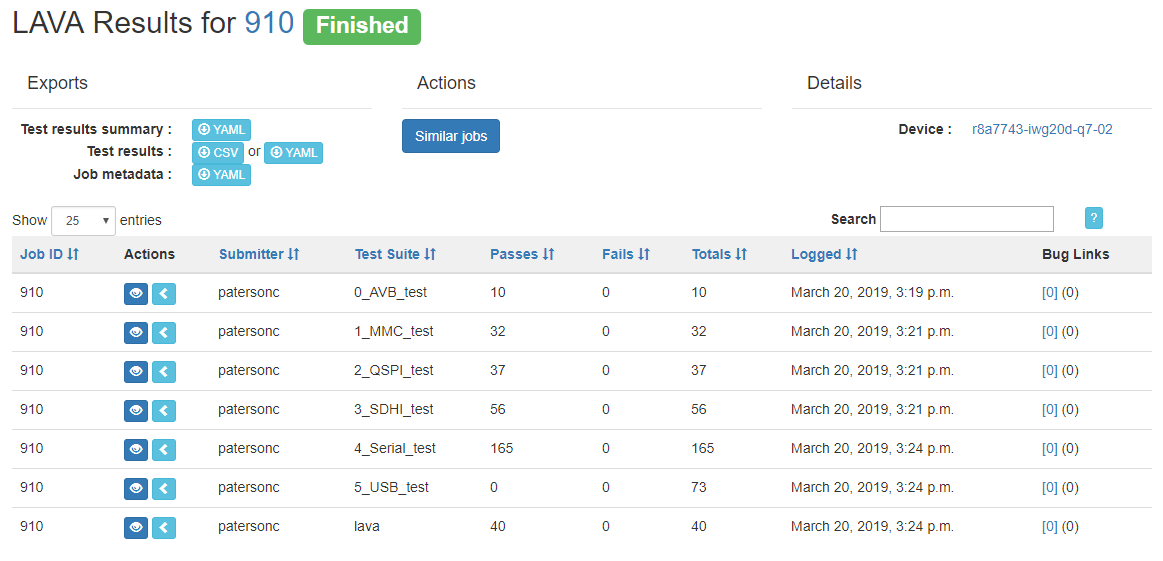
The results from Job #910 can be seen here, a screenshot is added below.


